Showing posts with label GCP. Show all posts
Cloud SQL is a fully-managed database service that makes it easy to set up and use relational databases on Google Cloud Platform. This article covers the steps that will help in creating a MySQL 5 instance on Google Cloud Platform. It walks through the creation of a MySQL Instance,
setting root password creating schema and a table.
Creating Cloud SQL Instance
Cloud SQL is a fully-managed database service that makes it easy to set up and use relational databases on Google Cloud Platform. This article covers the steps that will help in creating a MySQL 5 instance on Google Cloud Platform. It walks through the creation of a MySQL Instance,
setting root password creating schema and a table.
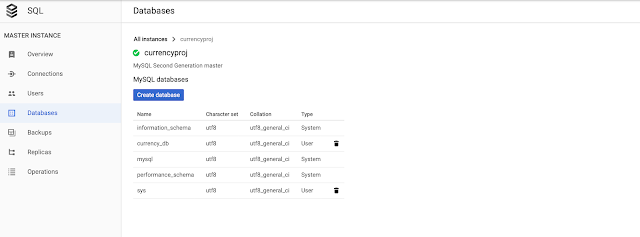
We will create an MySQL instance named currencyproj and once it is created we will create a database and one table.
Prepare Instance
Create environment variables that will be used later in the lab for your project ID and the storage bucket that will contain your data
export PROJECT_ID=$(gcloud info --format='value(config.project)')
export BUCKET=${PROJECT_ID}-ml
Create a Cloud SQL instance
Create currencyproj MySQL instance : currencyproj
gcloud sql instances create currencyproj \
    --tier=db-n1-standard-1 --activation-policy=ALWAYS
Set Root Passord
following sets the password for currencyproj instance.
gcloud sql users set-password root --host % --instance currencyproj \
 --password Passw0rd
Create an environment variable with the IP address of the Cloud Shell
export ADDRESS=$(wget -qO - http://ipecho.net/plain)/32
White list the Cloud Shell
Whitelist the Cloud Shell instance for management access to your SQL instance
gcloud sql instances patch currencyproj --authorized-networks $ADDRESS
Get Cloud SQL IP Address
Get the IP address of your Cloud SQL instance by running
MYSQLIP=$(gcloud sql instances describe \
currencyproj --format="value(ipAddresses.ipAddress)")
Create the currency name table by logging into the mysql command line interface
mysql --host=$MYSQLIP --user=root \
      --password --verbose
Create DB and Table
After logging into the MySQL console, create database and table
create database if not exists currency_db;
use currency_db;


CREATE TABLE IF NOT EXISTS CURRENCY_NAME
(
  id varchar(255),
  title varchar(255),
  symbol varchar(255),
  PRIMARY KEY (ID)
);
Summary
We are able to create an instance of MySQL and then created a database and table.
This article will cover the setups required to publish a static website on GCP and using a custom domain from Google domain. It assumes we have some content like html page etc. to publish on GCP as static site. Although it is written for domains registered with Google domain, any other domain providers should also work.
Assumptions
We have some static resources like HTML pages to be published.
We have secured a domain name with ownership.
We will be using CNAME to map the domain name to the static page bucket in GCP.
High level steps
1) Setting up the Custom Domain DNS to forward the request to the2) Setting up the Buckets on Google cloud
Setting DNS on the custom domain
We want the domain name to be mapped to GCP resource (bucket in our case holding static resources). Setting up the DNS for the custom domain is really simple, we just need to map the CNAME entry in the custom domain DNS section.
Login to Google Domain and go to the DNS setup page for the respective domain. Under the Custom resource records have an entry for www to c.storage.googleapis.com as follows.
Once we save the configuration as above we are good to go to the next section for setting up the static bucket in GCP.
To know more about CNAME and how it works A vs CNAME record explains the advantages of CNAME record and how it works.
Setting Buckets on Google cloud
Create a bucket whose name matches the CNAME you created for your domain.
For example, if you added a CNAME record pointing www.bootng.com to c.storage.googleapis.com., then create a bucket with the name "www.bootng.com".
To create a bucket:
Open the Cloud Storage browser in the Google Cloud Platform Console.
Click Create bucket to open the bucket creation form.
Enter your bucket information and click Continue to complete each step:
The Name of your bucket.
The Storage class and Location for your bucket.
Click Create.
Once the bucket is created we need to upload the content of the static site and then give appropriate permissions to the individual objects (files directories) or to the bucket itself.
To assign permission to the bucket:
Go to the list of bucket page and corresponding to the bucket just created click on the last column which will open the action menu like bellow and click on Edit bucket permissions link
Since we want to make the content of this bucket publicly available we need to grant read access to a special group called allUsers
Once this is done the bucket list will show that this bucket is available to public access.
Conclusion
With the above setting now when we type www.bootng.com will map to the content of the bucket www.bootng.com on GCP.
We still need to access resources explicitly for instance if we have welcome.html then we need to type www.bootng.com/welcome.html in the browser
Few things not covered in this article are
1) Mapping default page to the domain name -> so that we can just type www.bootng.com
2) Mapping subdomain to the GCP bucket -> so that we can just type bootng.com
The A and CNAME records are the two common ways to map a host name (“name”) to one or more IP addresses. There are important differences between these two records.
The A record points a name to a specific IP. If you want blog.knolare.com to point to the server 195.195.195.195.
A CNAME record, or Canonical Name record, is a pointer of one name to another. A CNAME record points a hostname to another name that is already created for a server or system
To add a CNAME entry to a Domain name to point to a named server do the following.
Login in to Google Domain
Go to DNS Setting the Domain, scroll down the page to the Custom resource records section.
Enter the following respectively
First field : www (or you can specify subdomain)
Second field: CNAME
Third field : 1h (default value for the TTL field)
Fourth field : c
Click add. Now the Domain or subdomain would be pointing to the Google Cloud Platform.
This article provide steps that to deploy an Angular App to Google GCP AppEngine.
I will be deploying a frontend Angular App (Angular Word Combiner) with does not need any backend.
Bellow is the screenshot of the Application that we would be deploying.
Google offers 2 options to deploy your application on GCP
Now if you goto https://angular-word-merger.appspot.com it should load the Angular App from GCP.
I will be deploying a frontend Angular App (Angular Word Combiner) with does not need any backend.
Bellow is the screenshot of the Application that we would be deploying.
Google offers 2 options to deploy your application on GCP
- Google App Engine
- Google Compute Engine
Here I will be using Google App Engine to deploy the Word-Combiner App. App Engine is the Googles managed platform to deploy application. App Engine comes in two flavors Standard and Custom. I will be using App Engine Standard.
First get the Word Combiner APP from git repo to local disk.
git clone https://github.com/siddharthagit/angular-word-merger.gittouch app.yaml
# [START runtime]
runtime: nodejs8
handlers:
- url: /
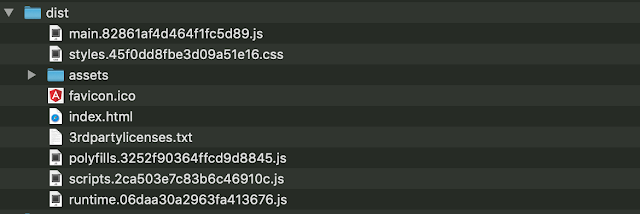
  static_files: dist/index.html
  upload: dist/index.html
- url: /
  static_dir: dist
# [END runtime]
ng build --prodgcloud app deployNow if you goto https://angular-word-merger.appspot.com it should load the Angular App from GCP.


